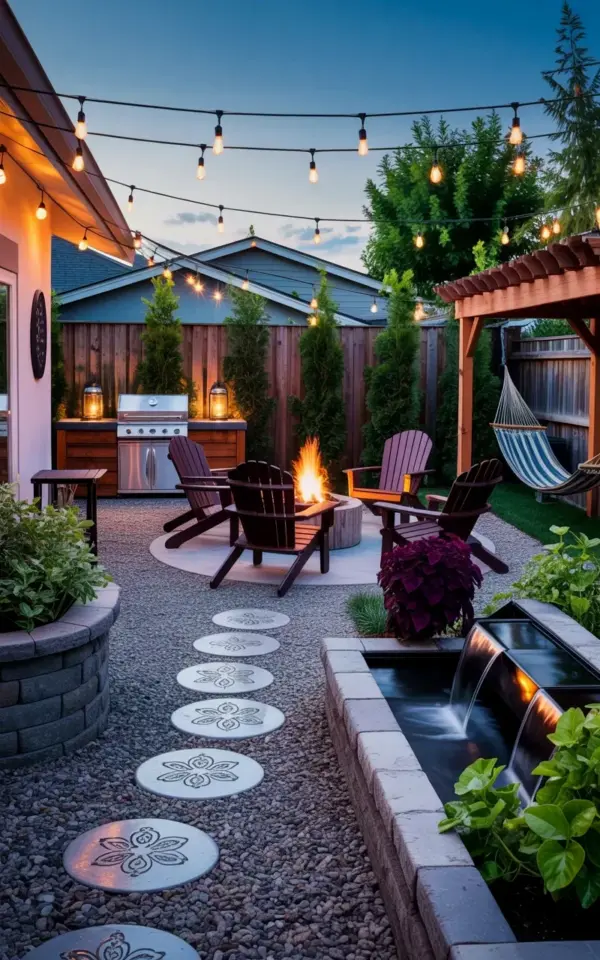
So I stumbled across this photo of a cozy backyard patio last week, and honestly? I couldn’t stop staring. The string lights overhead, the crackling fire pit, two beautiful water features on either side, and gravel ground with floral stepping stones – it looks like the kind of place where you’d lose track of time. And that is exactly the feeling I want to help you recreate. Whether you start from scratch or tweak your existing setup, this guide breaks down each element it into real, actionable steps.
How to Pick the Best Layout for Your Backyard Patio Setup
First things first: you need a spot that feels intentional, not just shoved in a corner. Look at your yard and imagine sitting there after a long day. Where would the evening light hit? Where do you naturally gravitate? In that photo, the patio sits against a wooden privacy fence with climbing vines, which instantly defines the space. That’s smart – it creates a room outdoors.
Measure the area and mark out a rough circle or rectangle for the fire pit. Leave enough room for chairs to scoot back without hitting the fence. I learned this the hard way when my first patio was too tight. You want at least three feet of walking space around the chairs. Gravel works beautifully because it drains well and softens the look, but you could also use pavers or decomposed granite. Just be honest about your climate – if you get heavy rain, gravel will need occasional topping off.
Here’s a weird little tip: before you commit, set out your chairs and a cardboard box as a pretend fire pit for a day. Walk around it, sit in each chair, see if the flow feels right. It sounds silly, but it saves you from moving heavy materials later. Trust me.
Hanging String Lights the Right Way for a Warm Glow
String lights are the star of that photo, no question. They cast a soft, amber light that makes everything look dreamy. But here’s the thing – hanging them poorly ruins the whole vibe. You want them to drape gently, not sag in a sad straight line. Start by finding anchor points: screw hooks into the fence, install wooden posts, or use a tall tree branch.
I prefer the Edison bulb style – larger bulbs, warm white, about 2700 Kelvin. Avoid cool white or blue tones, they kill the cozy mood. For that photo’s look, space the lights about 18-24 inches apart and let them hang low enough to feel intimate but not so low you smack your head. If you have a fire pit, keep the bulbs at least six feet above the flames. Safety first, obviously.
One more thing: use outdoor-rated extension cords and a timer. You don’t want to run out in the rain to unplug them. Set the timer for dusk to midnight, and you’ll always come home to a lit patio. That alone makes the space feel alive.
Fire Pit Placement and Seating That Keeps You Warm and Safe
The fire pit in the photo is right in the center, surrounded by dark brown Adirondack chairs. That’s a classic layout, but the distance matters. You want the chairs close enough to feel the heat but far enough that your shins don’t roast. For a typical 36-inch fire pit, place the front edge of the chair about 4 to 5 feet away. Test it by sitting down – if you have to lean forward to be warm, scoot them in a few inches.
I love Adirondack chairs because they force you to lean back and relax. But they are not super easy to get out of, so keep that in mind if you have older guests. Dark brown or black hides smoke stains better than lighter colors. And whatever material you choose (wood, resin, metal), add cushions. Honestly, a bare wooden seat gets uncomfortable after 20 minutes. A thick cushion changes everything.
Fire safety talk real quick: place your fire pit on a non-flammable surface like gravel, stone, or concrete. Keep it at least 10 feet from any structures, overhanging branches, or vinyl fencing. The photo shows a wooden fence with vines – that’s fine as long as the flames are far enough away and the fence is treated or fire-resistant. Also have a bucket of water or a garden hose nearby, just in case. Not trying to be a buzzkill, but a cozy patio shouldn’t become a fire hazard.
Adding Water Features to Create a Soothing Soundscape
Look, water features are the secret ingredient that most people skip. In the photo, there are two: a stone waterfall on the left and a raised planter with a cascading waterfall on the right. That’s overkill for some yards, but hear me out. A single water feature adds white noise that drowns out traffic, neighbor’s dogs, and that weird hum from the streetlight. It’s like nature’s relaxation track.
If you have a small patio, go with a tabletop fountain or a narrow cascade like the raised planter version. If you have more space, a stone waterfall that spills into a basin is gorgeous. You can buy pre-formed kits or build one with a liner and a pump. The sound should be a gentle trickle, not a gush – adjust the flow rate on the pump. And please, clean the pump once a month during summer. Algae buildup turns that peaceful gurgle into a sad splutter.
Here’s a quick checklist for choosing a water feature for your cozy patio:
- Size: match it to your patio area – a huge waterfall next to a tiny fire pit looks off.
- Power source: most need an outdoor outlet, but solar pumps work for small features if you live somewhere sunny.
- Maintenance: expect to top off water weekly (evaporation), and drain & scrub every few months.
- Sound: listen to demo videos online – some sound like a bathroom faucet, others like a mountain stream.
Gravel Paths, Stepping Stones, and Seating That Ground the Space
That gravel ground in the photo isn’t just pretty – it’s practical. Gravel lets water drain, prevents mud, and adds a satisfying crunch underfoot. Go with pea gravel or crushed stone, about ¾ inch size. Avoid sharp angular gravel near where you walk barefoot, those little buggers hurt. Lay down a weed barrier fabric first, then spread gravel about 2-3 inches deep. Rake it smooth, then stomp it down a bit.
The floral stepping stones are a lovely touch. They break up the monotony of gravel and guide the eye. You can buy them at any home store, or make your own with concrete and a mold. I made some last summer with pressed leaves – not gonna lie, they cracked in the first freeze. So buy pre-cast if you live where it frosts.
And those dark brown Adirondack chairs? They’re practical because they don’t show dirt easily and they match almost any wood or earth tone. If you want something more modern, go with deep teal or charcoal. But honestly, the dark brown in the photo gives such a grounded, cabin-in-the-woods vibe that I would not change it.
Privacy and Greenery with a Wooden Fence and Climbing Vines
Without the fence, that patio would feel exposed. The wooden privacy fence is the backbone of the whole setup. If you don’t have a fence, consider a lattice screen or a row of tall planters. But a solid wood fence at least 6 feet high gives you total seclusion. And climbing vines soften the hard edges – in the photo, they’re probably ivy or jasmine climbing up. Jasmine smells amazing in the evening, but it can get aggressive. I’d go with a non-invasive climber like clematis or climbing hydrangea.
Before planting, check how much sun that fence gets. Some vines need full sun, others do fine in partial shade. And attach a trellis or wire grid to the fence so the vines have something to grip. They won’t climb bare wood easily. Water them regularly the first year, then they’ll take off on their own. Within two seasons, that fence will look like it’s been there forever.
One more trick: add a few potted plants near the chairs – ferns for a lush look, or lavender for scent. They break up the hard lines and make the space feel lived in. Not everything has to be perfect, just relax. That’s the whole point, right?
Wrapping Up Your Cozy Backyard Retreat
You don’t need a massive budget or a team of landscapers to pull this off. Start with the fire pit and chairs, then layer in the string lights, then add one water feature. The gravel and stepping stones can be a weekend project. The fence and vines take time but pay off huge. Build it piece by piece, and soon enough you’ll have a spot where you actually want to spend every warm evening. So go ahead – grab a blanket, light the fire, pour yourself something cold, and enjoy the glow. You’ve earned it.
#backyardpatio #firepit #stringlights #waterfeature #cozyoutdoor
Leave a Comment