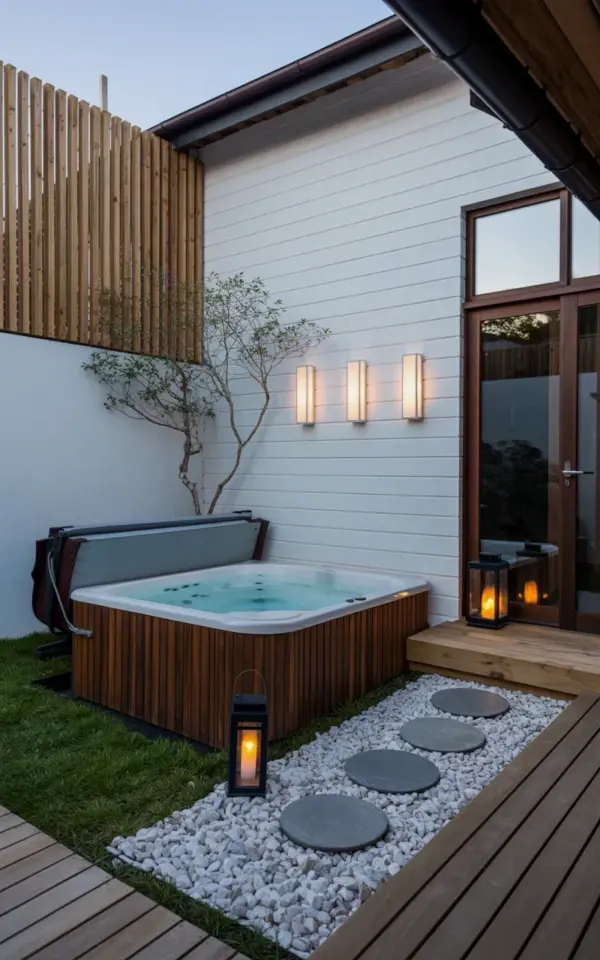
The soft glow is what catches you first. Three rectangular lanterns cast a warm, honeyed light across a wall of crisp white shiplap, and the water in the hot tub is perfectly still. It’s the kind of scene that makes you want to pour a glass of something cold and just sit there, letting the evening do its thing. This particular hot tub deck feel so intentional, but here’s the secret: every single element in it, from the river rocks to the privacy screen, is something you can pull off without a massive renovation budget.
Look, I’ve been down this rabbit hole. I spent three months planning a backyard update and nearly had a heart attack at the quotes from contractors. So I learned to get clever. I figured out how to build that serene, spa-like vibe using materials from the hardware store, a few weekend afternoons, and some serious bargain hunting.
**White Shiplap Walls: The Backdrop That Does the Heavy Lifting**
White shiplap is not just for farmhouse living rooms anymore. Out here, against a wooden deck, it works a specific kind of magic. It reflects the lantern light beautifully and makes the entire space feel larger and cleaner.
Now, real wood shiplap can get pricey, especially for outdoor use. Let me save you the sticker shock: use **PVC or composite shiplap panels**. Honestly, they look identical from a distance, they never rot, and they wipe down with a simple hose spray. For an 8×10 foot wall, you’re looking at a few hundred dollars, not a few thousand. I actually found a great deal on moisture-resistant panels at a local lumberyard that was overstocked. Ask around, see if anyone’s clearing out inventory.
**Wooden Slatted Privacy Screens on a Budget**
That slatted screen in the photo, the one that provides just enough seclusion without feeling like a fortress? That is your best friend. It filters the low evening sun, creates a shadow play on the shiplap, and stops your neighbors from watching you aggressively soak your shoulders.
The cheap way to do this is with **cedar fence pickets**. You can buy them for around two or three dollars each. You attach them horizontally to two vertical pressure-treated posts, leaving a half-inch gap between each board. You’ll need a saw, a drill, and about four hours of your life. The result is a custom look that costs less than fifty bucks. I’m not joking. It’s the single most cost-effective upgrade you can make. Just make sure you seal the cedar, or it will gray out over time. Though, honestly, the gray patina looks pretty great too.
**Lantern Lighting: The Easiest Mood Upgrade**
That wall isn’t just white, it’s a canvas. And the lanterns are the art. Three matching, wall-mounted rectangular lanterns are doing a lot of heavy lifting here. They’re not bright enough to read by, but that’s not the point. They’re meant to glow, to create a soft pool of light that makes the water look inviting.
You don’t need to hardwire anything. I used **battery-operated LED lanterns with a timer**. They cost less than a tank of gas each, and they come with a remote. Set them to switch on at dusk and they stay on until you go to bed. Look for ones with a warm color temperature, around 2700K. Anything higher and you’ll feel like you’re sitting in a hospital waiting room, which is decidedly less relaxing.
**River Rock Path and Stepping Stones: Texture Underfoot**
Let’s talk about the ground. There’s a path of white river rocks leading to the deck, punctuated by four gray stepping stones. This isn’t just for looks, though it absolutely grounds the whole design. It’s strategic. It keeps muddy grass from being tracked onto the deck and gives your eye a path to follow.
Here’s a tip if you’re doing this yourself: lay down landscaping fabric first. Trust me, you do not want to spend your summer picking weeds out of white pebbles. I did that once, and I lost the will to live somewhere around week six. The rocks themselves are dirt cheap at any landscape supply place. The heavier pavers are the bigger expense, but you can use simple concrete squares or natural flagstone. Put them at a comfortable stride distance, about 24 inches apart, so walking along the path feels natural.
**The Little Tree and the Planter: Scaling Your Escape**
Notice the small tree in the photo with its delicate branches. It’s a subtle reminder that you aren’t just in a wooden box; you’re in a garden. You don’t need a huge tree. A **Japanese maple, a small ornamental grass, or even a potted olive tree** will do the trick.
The planter breaks up all the straight lines and hard angles of the wall and deck. It softens the space. On a budget, hit up the clearance section at your local nursery. They often have perfectly healthy trees that are just past their “blooming peak” season, marked down by half. More importantly, a planter with a tree gives you that “little escape” feeling. It connects the built environment to the natural world, which sounds fancy but really just means you’ll feel more at peace when you sit down.
**Making It Work For Your Own Space**
Here’s the thing about this design: it’s highly adaptable. Don’t have a huge deck? You can mount the shiplap directly to the exterior wall of your house. No privacy screen budget? Use two large potted grasses to mimic the screening effect. Just get the core elements right: the white backdrop, the warm light, and the organic path.
The whole goal is to create a feeling, not just a look. This setup is about slowing down. It’s about the sound of the water, the warmth of the wood, and the gentle glow of those lanterns. It’s not about impressing anyone; it’s about giving yourself a reason to step outside.
Ok so, if you’re ready to build something that feels 10 times more expensive than it actually is, start with the lighting and the rocks. It’s a small effort that instantly changes the vibe. Then, set aside a weekend for the shiplap. It’s a lot of straight lines and measuring, but the payoff of sitting in that glowing, warm space makes it worth every second of effort. Save this idea to Pinterest, and start sketching out your own little slice of backyard peace. 🍃
Leave a Comment