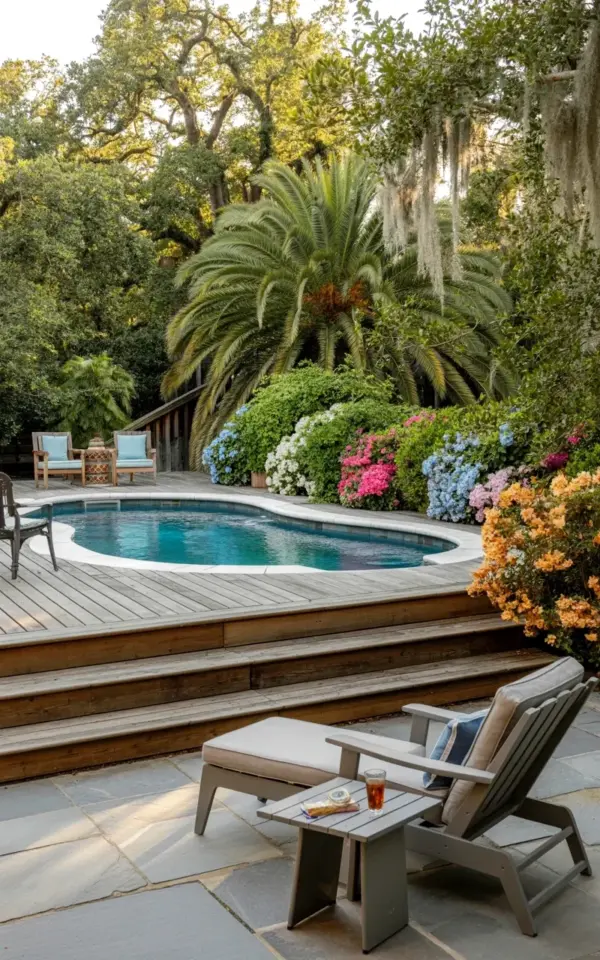
Planning a backyardpool? That curved oval pool with the wooden deck and stone patio is my go-to inspiration. Honestly, I stared at that photo for weeks. The gray lounge chair, the glass of iced tea, the pink azaleas and blue hydrangeas around the border. It feels like a vacation spot. But here’s the thing: you don’t need a blank check to make this happen. Not gonna lie, I’ve built two pools on tight budgets (and messed up plenty along the way). So let me save you some money and a few headaches. This guide is real-world, budget-conscious, and packed with specific choices that actually work.
Choosing the Right Pool Shape (Without the Price Tag)
Ok so, that oval shape in the photo? It’s not just pretty. A curved oval pool is actually one of the most cost-effective shapes to build. Why? Because it uses fewer corners and less structural reinforcement than a geometric rectangle. And fewer corners mean cheaper liner and less labor. Look, I wanted a kidney shape once. The quote made me gasp. Oval pools are easier to install, especially with a vinyl liner, and they fit naturally into a backyard without looking like a concrete rectangle dropped from a helicopter.
My advice: go for a moderate size. Bigger is not better when you’re on a budget. A 12×24 foot oval pool gives you plenty of room to swim laps, float around, and still leave space for a deck and patio. The white stone border from the photo? That’s a simple coping stone, not expensive marble. You can find precast concrete coping in a white or light gray for about $5 per linear foot. That’s budget gold.
Building a Budget-Conscious Wooden Deck
Let’s talk about that wide wooden deck. Rich brown planks, wide steps, the whole deal. Here’s the thing: pressure-treated pine will save you a ton of money compared to cedar or tropical hardwoods. And honestly, pine stains beautifully. Use a semi-transparent brown stain and it will look exactly like the photo. I used a product called TWP (that’s not a plug, just what I found at the hardware store) and it held up for five years before I needed a re-coat.
But measure twice, cut once. Seriously. I once cut a deck board an inch too short and spent an afternoon fuming and recutting. The wide step design from the photo is actually smart for budget reasons. Three wide steps mean fewer individual stair treads than a narrow staircase. Fewer cuts, less material, less chance for error. And wide steps feel luxurious. You can sit on them, set down a drink, whatever.
- Decking material: pressure-treated pine, stained in a warm brown. Under $2 per square foot.
- Fasteners: use hidden deck clips (like Camo or similar) to avoid visible screws. It looks cleaner and costs maybe $50 extra total, so worth it.
- Sealant: don’t skip it. Water damage is the enemy of budget builds. A gallon of quality waterproof sealant runs about $40.
Stone Patio Options That Don’t Cost a Fortune
The stone patio in the inspiration photo is smooth, gray, and seems to flow right from the deck steps. Now, real flagstone will crush your wallet. I’m talking $15 to $30 per square foot installed. Hard pass if you’re counting pennies. Instead, look at concrete pavers in a gray blend. They mimic natural stone beautifully and cost around $3 per square foot for the materials. Or even better: try a stamped concrete overlay. One buddy of mine did a 200-square-foot patio for $800 in materials, including the stamp pattern. It looks like slate but costs like concrete.
Here’s a weird personal detail: I once spent a whole weekend laying pavers only to realize the base wasn’t level. The first rain turned my patio into a kiddie pool. So do yourself a favor, rent a plate compactor and use 4 inches of crushed stone base. That’s not glamorous advice, but it’s the difference between a patio that lasts and a tilted disaster. The three wide wooden steps in the photo bridge the deck and patio perfectly, so measure that transition carefully. You want the final step to land flush with the stone surface. No tripping hazard, no awkward gap.
The Power of Three Wide Steps: A Simple Transition
Seriously, why three wide steps? Because it’s the sweet spot. One step feels like a curb. Two steps feel like an afterthought. Three steps create a deliberate, graceful descent onto the stone patio. And wide steps (four feet across or more) let you place potted plants on either side without blocking traffic. Not gonna lie, I’m obsessed with that detail from the photo. It makes the whole layout feel cohesive.
Budget tip: instead of building a solid concrete step base, use precast concrete step stones and then wrap them with the same decking wood. You build a wooden frame, drop in the stone, then nail deck boards on top. It’s cheaper than pouring concrete and if a board rots, you just replace one piece. I’ve done this twice and it works. The thickness of the steps should match the deck height, obviously. Measure the deck surface to the ground, divide by three, and you’ve got your riser height. Keep each riser between 6 and 7 inches for comfort. My first set of steps had a 9-inch riser and my grandma nearly tripped. Don’t be like me.
Landscaping on a Dime: Pink Azaleas and Blue Hydrangeas
Look at that photo. Pink azaleas, blue hydrangeas, orange flowering bushes. Instantly adds color without spending on expensive perennial beds. Here’s the bad news: hydrangeas are fussy about soil pH. If you want blue flowers, the soil must be acidic. If your soil is alkaline, your hydrangeas will bloom pink. Ask me how I know. I planted three hydrangeas in neutral soil and got pale lilac. Not blue. So you can either buy soil acidifier (cheap, about $10 a bag) or just embrace the color you get. Pink hydrangeas look great with azaleas anyway.
Azaleas are easier. They love partial shade, and they bloom like crazy in spring. Buy smaller shrubs (one-gallon pots) and let them grow. They fill in within two years. The orange flowering bushes in the background? Those might be firebush or butterfly weed. Both are drought-tolerant and cheap from nurseries. Budget total for shrubs: maybe $60 for four or five plants. Way less than building a retaining wall or installing a water feature. And flowering shrubs attract bees and butterflies, which is a bonus if you like that buzzing vibe. I do.
Finishing Touches: Gray Lounge Chair, Iced Tea, and the Little Extras
That gray cushioned lounge chair with the side table and iced tea? That’s the vibe we’re all after. But you don’t need a designer piece. A simple aluminum frame chair with a plush cushion from a big-box store costs around $150. Gray hides dirt and sun fade better than white or beige. I got mine from Target, honestly. It’s lasted three years so far. The small side table can be a cheap teak-look resin table for $40. And the iced tea? That’s free. (Glass from a thrift store, 50 cents.)
For the crystal blue water, chlorine tablets and a good pump are non-negotiable. But you can cut costs by using a solar cover to reduce evaporation and chemical loss. That white stone border around the pool? Again, precast coping is your best friend. One more weird aside: I use a pool noodle to float my iced tea on a tiny raft. It’s ridiculous but my guests love it. The point is, the little details make the space feel intentional. A set of string lights overhead adds ambiance for under $30 and you’re done. Save your money for the azaleas and the deck stain.
Alright, that’s the whole picture. From the oval pool shape to the three wide steps, the stone patio, and those flowering shrubs, you can recreate this backyard pool setup without emptying your savings. Honestly, the best part is sitting on that deck with an iced tea and knowing you built it yourself (or at least smartly pieced it together). Save this post for your own pool project and let me know how your azaleas turn out. Happy planning.
#backyardpool #pooldesign #woodendeck #landscapingideas #outdoorliving
Leave a Comment