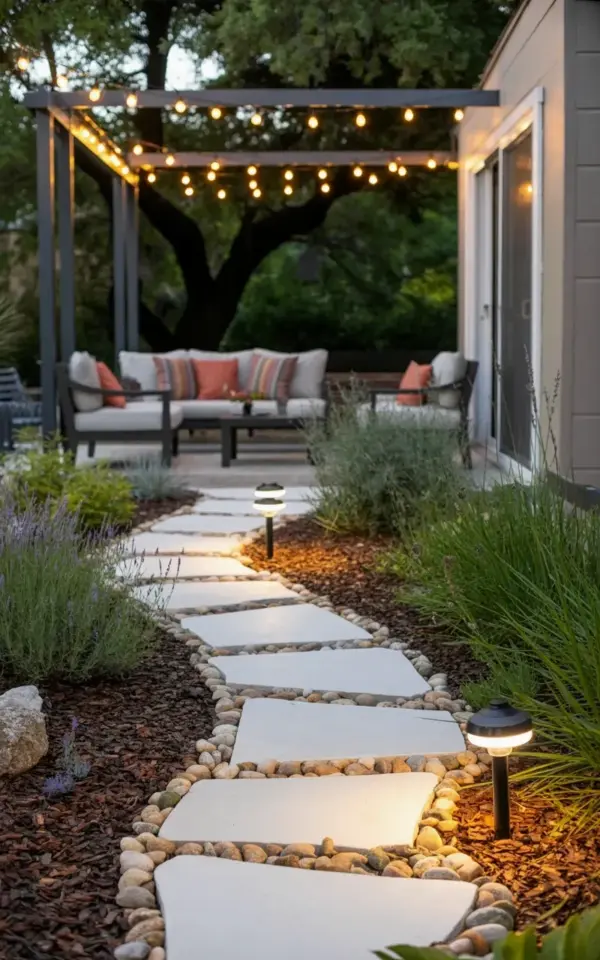
Honestly, when I first saw this exact setup in a photo, I had to stop scrolling. A garden pathway with large, irregular white stepping stones, dark chocolate mulch, and soft purple lavender just hits differently than the usual cookie-cutter paver rectangle. And that covered patio with coral cushions in the background? Total dream scenario. If you have zero experience with landscaping and you want this exact look, you are in the right place.
Building a walkway like this isn’t about heavy machinery or a landscape architect. It is about grabbing a shovel, picking out some stones you actually like, and trusting the process. The addition of solar garden path lights turns the whole space from a daytime feature into a cozy evening retreat. Let me show you exactly how to pull it off, assuming you have never touched a garden trowel in your life.
Why the Stepping Stone + Mulch Combo Works So Well
The secret here is contrast. The white stones against the fresh dark brown mulch create a crisp, clean look that instantly draws your eye to the backyard patio. It is not random placement either though, it just looks that way.
There is a reason so many people are moving toward this style. It is forgiving. Unlike poured concrete, you do not have to get it perfectly level. Unlike gravel, it does not scatter everywhere and annoy you when you walk on it. The large stones sit sturdy while the mulch keeps the moisture in and the weeds out.
And honestly, this setup is a great weekend project. You can knock out a modest path like this in a couple of days if you are moving at a relaxed pace. No rush, just steady work and a good playlist.
How to Choose the Right Stones for a Dry Landscaping Path
When picking your stepping stones, think about shape and size more than anything else. You want large, irregular pieces that feel natural underfoot. Perfectly round or square pavers will not give you that organic, dry-landscaping vibe that the photo shows.
Here is what to look for in a stone:
– Travertine or flagstone in a light color (white, cream, or pale gray) to pop against dark mulch.
– Pieces that are at least an inch thick, so they don’t crack under weight.
– A textured surface, non-slip is important when the path gets wet.
– Varying widths so the spacing feels relaxed and not too uniform.
You can buy these at a local stone yard, and honestly, going in person beats shopping online. You can walk around, flip stones over, and pick out the ones with the best character. I once made the mistake of ordering stone sight unseen, and half of it was too fragile. Learn from my clumsy mistake.
Prepping the Ground: Mulch, Pebbles, and the Base Layer
Ok so here is the part nobody tells you about before you start. You need to dig down a little so the stones sit flush with the soil. Otherwise, you will trip on every single one of them.
Spread a layer of crushed rock or sand down first to stabilize the big stepping stones. Tamp it down firmly with a hand tamper or just the back of a shovel if you do not want to buy another tool. Then, set your main stones and check them with a level in different directions.
Once the stones are set, you fill the gaps. In the photo, you can see small tan-colored rocks and pebbles nestled near the base, which break up the stark line between stone and mulch. This detail makes the whole thing look more deliberate. Then, you pile the fresh dark brown mulch up around everything.
Just a heads up on mulch, the first heavy rain will make it look a bit wild. That is fine. Just rake it back into place when it dries out. Weeding is easier with a thick layer, but you will still get the occasional stubborn sprout. That is just gardening.
Choosing Plants: Sage and Lavender for a Drought Tolerant Garden
Let me guess, you love the look of the plants but you are worried you will kill them. That is exactly why lavender and sage are perfect here. They basically thrive on neglect. They want full sun, decent drainage, and a whole lot of leaving alone.
Lavender gives you that soft blue-purple color and a scent you can actually smell as you walk past. It is not just a visual thing. Brushing your hand against it releases the essential oils, and honestly, it smells like a high-end spa. Sage has a slightly different texture, a bit more rugged, which makes the path feel natural rather than overly perfect.
In a drought tolerant garden, these plants are the workhorses. They do not need constant watering once they are established. The dark brown mulch helps retain the moisture they do get, so you are not out there with a hose every single evening.
One weird thing I learned the hard way: cut the lavender back in early spring. If you skip it, the plant gets woody and ugly in the center. It seems harsh to hack it down, but it rewards you with fresh growth. Gardeners have been doing this for centuries, it is not some new trend.
Lighting the Path with Solar Path Lights
This is the part that elevates the whole backyard patio experience. Solar garden path lights are ridiculously easy to install because there are no wires. You literally push the stake into the ground and let the sun do its job.
Space them out at regular intervals along the edge of the stones, but do not overthink it. The goal is to outline the walkway so you, or your guests, can see where you are stepping at night. A soft glow is more inviting than a blinding floodlight.
Here is what to consider when buying solar lights:
– Check the lumens. Around 10 to 20 lumens gives a nice subtle glow for a garden path.
– Look for a metal housing, plastic ones get brittle and crack after a season.
– Make sure the panel gets enough direct sun during the day, anywhere else and they will be dim.
– Pick a warm white light, it looks much more natural with the lavender and stones.
There is a small joy in watching them flicker on as the sun goes down. It is like the garden is saying goodnight. And you do not have to pay a cent in electricity to enjoy it.
Adding Final Touches to the Backyard Patio
Do not stop at the path. The covered patio area in the description has gray outdoor furniture with coral-colored cushions and striped throw pillows, and that is such a smart move. The gray holds its own against the sun, but the coral warms up the whole scene.
Consider adding a few potted herbs near the patio steps to tie the whole space together. Ornamental grasses on the border give movement, especially when the wind picks up in the evening. They rustle a little, and it is honestly the most relaxing sound.
The path should feel like it belongs to the house. If the stones suddenly stop, the eye kind of gets lost. Make sure your walkway lands neatly at the patio edge or the step, so the transition feels intentional.
How Much Time and Money Does This Actually Take?
Alright, let’s be real about the cost because internet photos never tell you that part. For a walkway around 20 feet long, you can expect to spend a few hundred dollars on the stones alone if you buy premium travertine. Mulch is cheap, maybe forty bucks a yard.
The plants are where it adds up, depending on how many you buy. But herbs and lavenders are usually available in small pots for a reasonable price. You can also split the plants over time, but that forces you to wait for them to fill in. I am not a patient gardener, so I bought larger ones.
In terms of time, give yourself a weekend and one evening to add the solar path lights. The prep work is the slow way. Once the ground is ready, the path comes together pretty fast.
Maintaining Your Solar Garden Path Over the Years
Here is the good news, this is a low-maintenance setup. You will need to top up the mulch once a year or so, because it breaks down a little over the winter. That is normal. It actually enriches the soil underneath.
The solar lights might need new rechargeable batteries after a couple of summers. It takes five minutes to swap them out, so do not be scared off by that. And keep the leaves off the path, especially in fall. Wet leaves on stone get slippery, and nobody wants a bruised tailbone on the way to the patio.
Just remember, a little imperfection is part of the charm. Stones will settle, mulch will shift, and the lavender will get a little lopsided in the wind. That is what makes it look genuine. Your backyard patio should feel lived in, not wrapped in plastic.
I really hope you go for it. Match the photo loosely and let your own space guide the details. Grab a shovel this weekend, pick out some solar garden path lights, and make a space you actually want to walk through every single day. Your dry landscaping project is closer than you think.
#gardenpathway #solarpathlights #steppingstones #droughttolerantgarden #backyardpatio
Leave a Comment